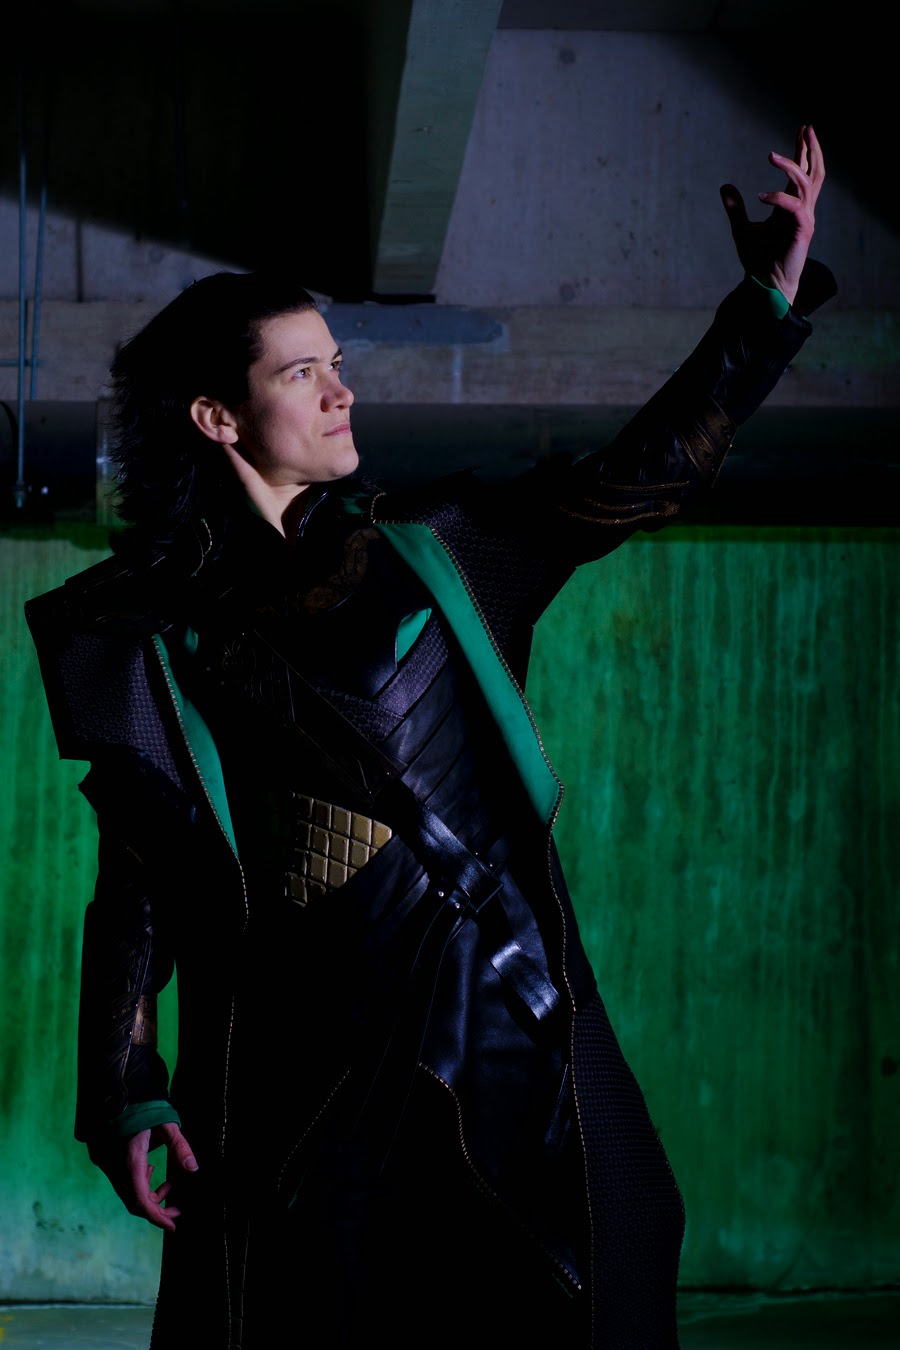
Loki, from the Marvel Avengers movie
Loki, from the Marvel Avengers movie
This was an amazing challenge for me! I learned to sew with leather, textured vinyl, worbla scaling, and learn to design with
a client. Please note: I did the Undershirt(attached to the sleeves)
pants, boot covers, and Overcoat with the spaulders. I didn't have
anything to do with the leather armour (ie bracers, chest plate, etc...)
All my pieces are custom drafted and built by me.
The green is all galaxy twill. The textured fabric is vinyl, and the
over lapping straps on the shirt and sleeves is sheep leather. The Over
coat is all 2-3mm bovine leather. The entire hem of the coat (and some
of the shirt skirts) is edged in brass zipper stops, same as the movie!
Pants have the same overlapping leather as the shirt, but the outer
boots covers at 4mm saddle leather!
This was so much fun, so much stress, and there were many a time that I
wouldn't have made it through the day without coffee. Looks amazing!
Please like and Share on Facebook to support small-town, local designers! You know, if you want
to...
All Photos done by Larry Holder, Point of Light Productions


 |
| Yay! Random acts of vandalism! |


Drizzt Do'Urden- Green cloak
This is a pre-show to a future properly done photo shoot that feature a cosplay of Drizzt Do'Urden from R.A. Salvatore's beautifully written world. I wanted to make an update to show what has been taking up a lot of my time recently. The whole costume looks amazing, but the only piece I did was the cloak. The commissioner and I are planing to go outside in the snow to photograph Drizzt in his natural Icewind Dale surroundings, however it might take a month or two for the snow to fall. Should be a fun time. :)


Nox the Barbarian
Over the summer I agreed to do a full set commission for a friend who goes to the same live action role play game. He simply said, "Nox is race changing into a barbarian, can you design something?" He gave me a budget, and set me loose in the fur section at the fabric store. Let me just say I had a field day, but not in the way you might think. You see, this was the job that helped me discover how much I need direction when designing for other people. I had to continuously get feedback on what I was doing, for fear I would finish the costume and something would be amiss. I am sure that with time and experience, I can overcome this need for constant reassurance. Until then, I'll still need to be pointed in the right direction.


The belt was really fun to do. I wanted it to look like past kills, and trophies. So I used scraps of random fur and began sewing the "tails" to the belt. The back laces up, but so Nox doesn't have to lace it up every time he wears it, there's a Velcro at the side seam. Shown in the picture to the right. There are also belt loops attached, to accommodate a real belt for pouch and sword frogs.

And finally, the leg warmers! It might be 30+ candaian degree outside, but I didn't want my barbarian to get cold ankles. The leg warmers are all fur, with elastics that secure under the knee.
Harley Quinn and The Joker
 |
| The Joker and Harley Quinn Costumes - my other half and I, 2011 Halloween |

I would say I make an excellent Harley Quinn, and having my boyfriend go as my Mr J. worked out really well. Both my costume and his were made by me, and took two painstaking months to finish. For Harley, I started with drafting an under bust corset, and modifying it at lot to get the desired look and fit. I used this tutorial to draft the corset: Underbust Pattern Tutorial, and it's excellent.

The corset is lined in soft black fabric, but the red wine colored vinyl makes it non-breathable. I decided to not use bones, figured the vinyl would hold the shape rather well, and it is held up by the military looking straps that I made myself. The grommets are inserted by hand, and the small silver studs were the hardest things in the world to find. I ended up taking a goth bracelet and taking it apart for the little pointy studs. And I used hidden Velcro under the lace-up panel in the front to make it easy to put on/take off. Here are some pictures below.


For the shirt and pants, I bought base fabric in the appropriate colors, and drafted my patterns. The buttons on the shirt are decorative, and the diamonds on the pants match the vinyl I used for the corset. The zipper on the pants was a pain to do, since I think zippers are the spawn of evil. I remember finally getting the zipper in, trying the pants on, and realizing the pants were too big for my hips. I then spent an hour taking in the back seam and the two side seams, and not even touching the zipper. After the zipper, I attached the belt loops, and secured a belt to hold them up.

Overall, Harley Quinn was the most fun making a costume I've had in a long time. It's a very complicated process that I had to figure out from scratch, and make adjustments as I went. Finding all the parts and finally fitting it all together gave me a real sense of accomplishment. I'm not sure what I can do to top myself, but I'm sure it will be just as fun.
Gailren - Partial Commission
 |
| Gailren, Heroically posing |
Gailren is a character from a live action role play, for whom I did a partial commission. I made the caster jacket. Gailren is a mage, and as such needs a fitted sleeve, so I designed this jacket keeping that in mind. The only other criteria was the inside pocket, which is displayed in the fourth photo in more detail.
I began this venture with my client telling me that he needed a jacket, with an inside pocket, and thought it would look good in green. So after buying the fabric, I set to work drafting my pattern. I used a base pattern from simplicity to start, and modified it to suit the new design. The fitted sleeves took the longest to figure out, but turned out perfectly. I made the wrist/forearm portions first, then gathered the sleeve into them, then inserted the grommets by hand. This was an excellent learning experience, as I didn't have a lot of experience with buttons or pockets before this. And yes, the chain mail is real.
 |
| Full Jacket View |
 |
| Fitted Sleeve - gathering around elbow |
 |
| Displaying the inside Pocket |
 |
| Fitted Sleeve - close up of lace up forearm |
Gypsy Costume
Here are some studio photos of my gypsy costume. Enjoy.


No comments:
Post a Comment